1. Introducción1. Introduction
CUIX Maker Pro es una aplicación de escritorio para Windows que crea y edita archivos de personalización .cuix de AutoCAD de forma visual. En vez de pelear con el editor CUI nativo o escribir XML a mano, armas el ribbon arrastrando comandos, archivos LISP, DLLs e iconos.CUIX Maker Pro is a Windows desktop app that builds and edits AutoCAD .cuix customization files visually. Instead of fighting the native CUI editor or hand-writing XML, you assemble the ribbon by dragging commands, LISP files, DLLs and icons.
Lee y escribe el formato real de AutoCAD, por lo que puedes abrir un bundle existente, editarlo y guardarlo en el mismo formato nativo que AutoCAD carga. Al terminar, exportas un paquete listo para desplegar o un instalador .exe de un solo clic.It reads and writes the real AutoCAD format, so you can open an existing bundle, edit it, and save it back in the native format AutoCAD loads. When you're done, you export a ready-to-deploy package or a one-click .exe installer.
2. Instalación y requisitos2. Installation & requirements
- Sistema: Windows 10 u 11 (64 bits).System: Windows 10 or 11 (64-bit).
- AutoCAD: cualquier versión con Autoloader (2013 en adelante) para desplegar los paquetes generados.AutoCAD: any version with the Autoloader (2013 and newer) to deploy the generated packages.
- Dependencias: ninguna. La app es independiente y funciona 100% sin conexión.Dependencies: none. The app is self-contained and runs 100% offline.
- Descarga el instalador de CUIX Maker Pro y ejecútalo.Download the CUIX Maker Pro installer and run it.
- Abre la aplicación. Arrancará con un proyecto nuevo en blanco.Open the app. It starts with a new blank project.
.cuix, LISP, DLL, iconos) se procesan localmente y nunca salen de tu equipo.Your files (projects, .cuix, LISP, DLL, icons) are processed locally and never leave your machine.3. La interfaz3. The interface
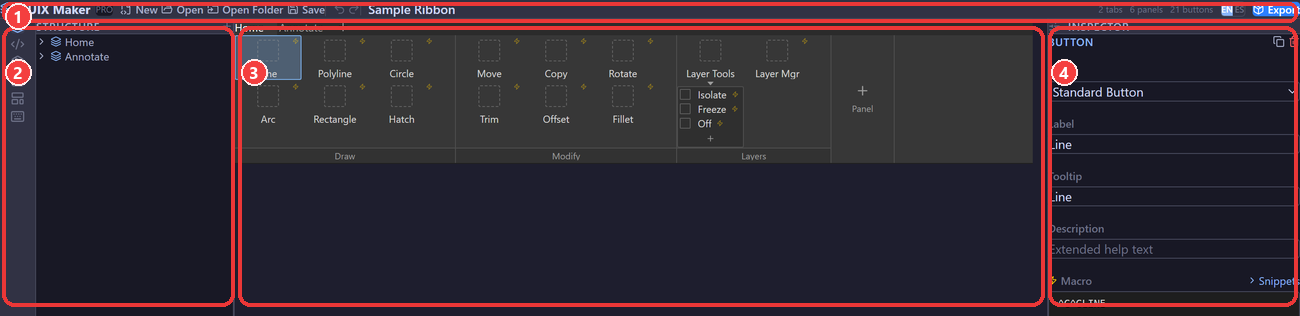
La ventana se divide en cuatro zonas.The window has four zones.
- ① Barra superior — la barra de acciones: todo lo que afecta al proyecto completo (crear, abrir, guardar, deshacer/rehacer, idioma y exportar).① Topbar — the action bar: everything that acts on the whole project (create, open, save, undo/redo, language and export).
- ② Estructura — navega y reordena: selecciona cualquier pestaña, panel, fila o botón para editarlo. Sus otras pestañas guardan los LISP, DLL, iconos y plantillas que arrastras al ribbon.② Structure — navigate and reorder: select any tab, panel, row or button to edit it. Its other tabs hold the LISP, DLL, icons and templates you drag onto the ribbon.
- ③ Lienzo — la vista previa en vivo de cómo se verá el ribbon en AutoCAD; lo construyes arrastrando comandos e iconos aquí.③ Canvas — the live preview of how the ribbon will look in AutoCAD; you build it by dragging commands and icons here.
- ④ Inspector — edita a fondo el elemento seleccionado: su tipo, etiqueta, tooltip, macro, icono y tamaño.④ Inspector — edits the selected element in depth: its type, label, tooltip, macro, icon and size.
La barra superiorThe topbar

- ① Nuevo — crea un proyecto desde cero, en blanco o a partir de una plantilla por industria.① New — creates a project from scratch, blank or from an industry template.
- ② Abrir — carga un archivo
.cuixreal o un proyecto guardado.cuixproj.② Open — loads a real.cuixfile or a saved.cuixprojproject. - ③ Abrir carpeta — carga un bundle completo desde el disco; al guardar, se sobrescribe en su sitio.③ Open folder — loads a full bundle from disk; saving overwrites it in place.
- ④ Guardar — escribe tus cambios (sobrescribe el original o guarda un
.cuixproj). También con Ctrl+S.④ Save — writes your changes (overwrites the original or saves a.cuixproj). Also Ctrl+S. - ⑤ Deshacer/Rehacer — retrocede o avanza por tus últimos 100 cambios.⑤ Undo/Redo — steps back or forward through your last 100 edits.
- ⑥ Exportar — abre el diálogo de exportación para generar el instalador o el bundle.⑥ Export — opens the export dialog to generate the installer or bundle.
4. Crear o abrir un proyecto4. Create or open a project
Tienes tres formas de empezar:There are three ways to start:
- Nuevo: botón New en la barra superior. Empieza en blanco o desde una plantilla por industria (Architecture, Civil 3D, Mechanical, AutoCAD clásico…).New: the New button in the topbar. Start blank or from an industry template (Architecture, Civil 3D, Mechanical, Classic AutoCAD…).
- Abrir archivo: Open carga un
.cuixreal o un proyecto guardado.cuixproj.Open file: Open loads a real.cuixor a saved.cuixprojproject. - Abrir carpeta: Open Folder carga un bundle completo (la carpeta
.bundlecon suPackageContents.xmlyContents/). Así CUIX Maker conoce la ruta original y puede sobrescribirla al guardar.Open folder: Open Folder loads a full bundle (the.bundlefolder with itsPackageContents.xmlandContents/). This lets CUIX Maker know the original path and overwrite it on save.
.cuixproj hasta que lo exportes.Original vs. new. If you open a project from disk (file or folder), it is treated as the original and saving overwrites it in place. If you create one from scratch, it is saved as a .cuixproj until you export it.5. Construir el ribbon5. Build the ribbon
La jerarquía del ribbon es: Pestaña → Panel → Fila → Botón.The ribbon hierarchy is: Tab → Panel → Row → Button.
- Pestañas: añade y renombra pestañas en la parte superior del lienzo. Una pestaña agrupa paneles.Tabs: add and rename tabs at the top of the canvas. A tab groups panels.
- Paneles: dentro de una pestaña, cada panel es un bloque de botones con su título. Cada panel siempre muestra un hueco "+" para añadir un botón.Panels: within a tab, each panel is a block of buttons with its title. Every panel always shows a "+" slot to add a button.
- Filas: los botones se organizan en filas dentro del panel; puedes apilar varias filas.Rows: buttons are arranged in rows inside a panel; you can stack several rows.
- Botones: arrastra para reordenar entre filas y paneles. Selecciona uno para editarlo en el inspector.Buttons: drag to reorder across rows and panels. Select one to edit it in the inspector.
En el lienzo de abajo, fíjate en los tres detalles señalados ①②③ (corresponden a la lista que le sigue):On the canvas below, note the three details marked ①②③ (they map to the list right after it):
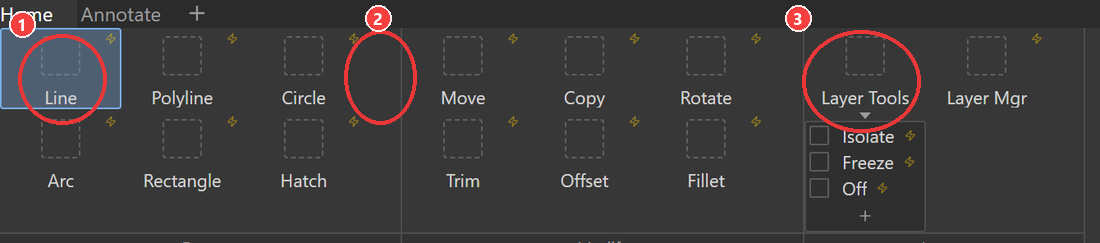
- ① Botón seleccionado — el borde azul marca el botón activo; sus propiedades aparecen en el inspector para editarlas.① Selected button — the blue outline marks the active button; its properties show in the inspector for editing.
- ② Hueco "+" — haz clic para añadir un botón nuevo a esa fila. Cada panel siempre ofrece uno.② "+" slot — click to add a new button to that row. Every panel always offers one.
- ③ Botón desplegable — el chevron (flecha) indica que el botón se despliega en una lista de sub-comandos al hacer clic.③ Dropdown button — the chevron (arrow) shows the button expands into a list of sub-commands when clicked.
6. Botones en detalle6. Buttons in depth
Cada botón tiene un tipo, una etiqueta, un tooltip, un icono y una macro. Los tipos disponibles:Each button has a type, a label, a tooltip, an icon and a macro. The available types:
| TipoType | DescripciónDescription |
|---|---|
| Standard | Botón simple que ejecuta una macro.A simple button that runs a macro. |
| Dropdown | Despliega una lista de sub-botones al hacer clic.Expands a list of sub-buttons when clicked. |
| Split | Botón con acción principal + flecha que abre sub-botones.A button with a primary action + an arrow that opens sub-buttons. |
| Flyout | Menú emergente de comandos relacionados.A fly-out menu of related commands. |
Para los tipos dropdown y split, el inspector muestra primero la lista de sub-elementos: añádelos, reordénalos y edítalos ahí. En el lienzo, esos botones muestran una flecha (chevron) que indica que contienen más comandos.For dropdown and split types, the inspector shows the list of sub-items first: add, reorder and edit them there. On the canvas, those buttons display a chevron indicating they contain more commands.
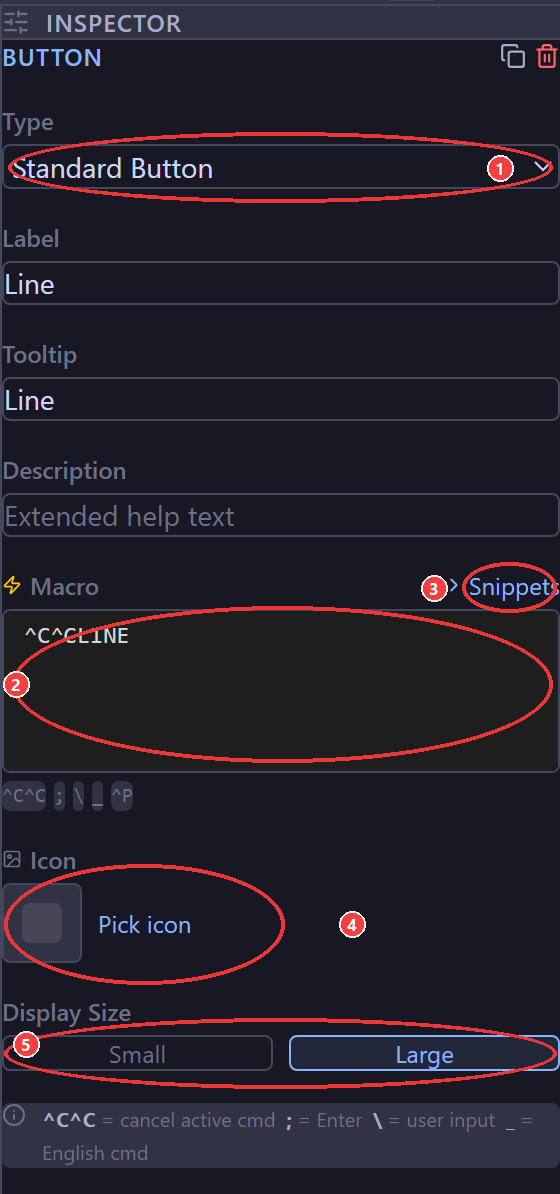
El inspector de un botón:A button's inspector:
- ① Tipo — define el comportamiento del botón: un comando simple, o uno que se despliega en sub-botones (dropdown / split / flyout).① Type — defines how the button behaves: a plain command, or one that expands into sub-buttons (dropdown / split / flyout).
- ② Macro — el comando que AutoCAD ejecuta al pulsar el botón; lo editas aquí en el editor de código.② Macro — the command AutoCAD runs when the button is clicked; you edit it here in the code editor.
- ③ Snippets — inserta con un clic fragmentos comunes de macro:
^C^C(cancelar),;(Intro),\(pausa para el usuario).③ Snippets — one-click insertion of common macro fragments:^C^C(cancel),;(Enter),\(pause for input). - ④ Icono — elige o importa la imagen del botón; se empaqueta dentro del
.cuixal exportar.④ Icon — pick or import the button image; it gets packaged inside the.cuixon export. - ⑤ Tamaño — cómo se muestra en el ribbon: grande (icono + etiqueta) o pequeño (compacto).⑤ Size — how it appears on the ribbon: large (icon + label) or small (compact).
7. Añadir comandos LISP7. Adding LISP commands
- Abre el panel LISP en la estructura y carga uno o varios archivos
.lsp.Open the LISP panel in the structure and load one or more.lspfiles. - CUIX Maker detecta los comandos definidos (las funciones
c:NOMBRE).CUIX Maker detects the defined commands (thec:NAMEfunctions). - Arrastra un comando a una fila (crea un botón) o sobre un botón existente (asigna su macro).Drag a command onto a row (creates a button) or onto an existing button (assigns its macro).
La macro generada carga el archivo solo si el comando aún no está definido, y luego lo ejecuta:The generated macro loads the file only if the command isn't defined yet, then runs it:
fboundp):Important (AutoLISP has no fboundp): se usa (if (not c:CMD)…), no fboundp (eso es Common Lisp y dispara el error «no function definition: FBOUNDP»). Además, load usa solo el nombre base del archivo (mis_utiles.lsp), no una subruta, porque AutoCAD busca por nombre en sus rutas de soporte.it uses (if (not c:CMD)…), not fboundp (that's Common Lisp and triggers the "no function definition: FBOUNDP" error). Also, load uses just the file's base name (mis_utiles.lsp), not a subpath, because AutoCAD searches by name across its support paths.8. DLL / .NET y ARX8. DLL / .NET & ARX
Carga un .dll (.NET) o .arx en su panel y arrástralo a una fila o botón. Se te pedirá el nombre del comando que expone la librería, y se genera la macro:Load a .dll (.NET) or .arx in its panel and drag it onto a row or button. You'll be asked for the command name the library exposes, and the macro is generated:
arxload de forma equivalente. La DLL/ARX se empaqueta junto a tu personalización para que AutoCAD pueda cargarla.For ARX, arxload is used equivalently. The DLL/ARX is packaged alongside your customization so AutoCAD can load it.9. Iconos9. Icons
- Importa imágenes
PNG,BMPoICOen el panel de iconos, o desde el inspector de un botón con «Browse external image…».ImportPNG,BMPorICOimages in the icons panel, or from a button's inspector via "Browse external image…". - Arrastra un icono sobre un botón (o asígnalo desde el inspector). Cada botón admite un icono pequeño y uno grande.Drag an icon onto a button (or assign it from the inspector). Each button supports a small and a large icon.
10. Referencia rápida de macros10. Macro quick reference
| FragmentoSnippet | SignificadoMeaning |
|---|---|
^C^C | Cancela dos veces el comando activo antes de empezar (equivale a Esc Esc).Cancels the active command twice before starting (like Esc Esc). |
; | Equivale a pulsar Intro.Equivalent to pressing Enter. |
\ | Pausa para que el usuario introduzca un dato.Pauses for user input. |
_ | Fuerza el nombre del comando en inglés (independiente del idioma de AutoCAD).Forces the English command name (language-independent). |
Puedes editar la macro de cualquier botón directamente en el editor de código del inspector.You can edit any button's macro directly in the inspector's code editor.
11. Guardar11. Saving
- Proyecto original (abierto del disco): Save (o Ctrl+S) sobrescribe el bundle en su sitio, conservando el formato original del proyecto.Original project (opened from disk): Save (or Ctrl+S) overwrites the bundle in place, preserving the project's original format.
- Proyecto nuevo: Save guarda un archivo
.cuixproj(tu trabajo en curso) que puedes reabrir más tarde.New project: Save writes a.cuixprojfile (your work in progress) you can reopen later.
12. Exportar y desplegar12. Export & deploy
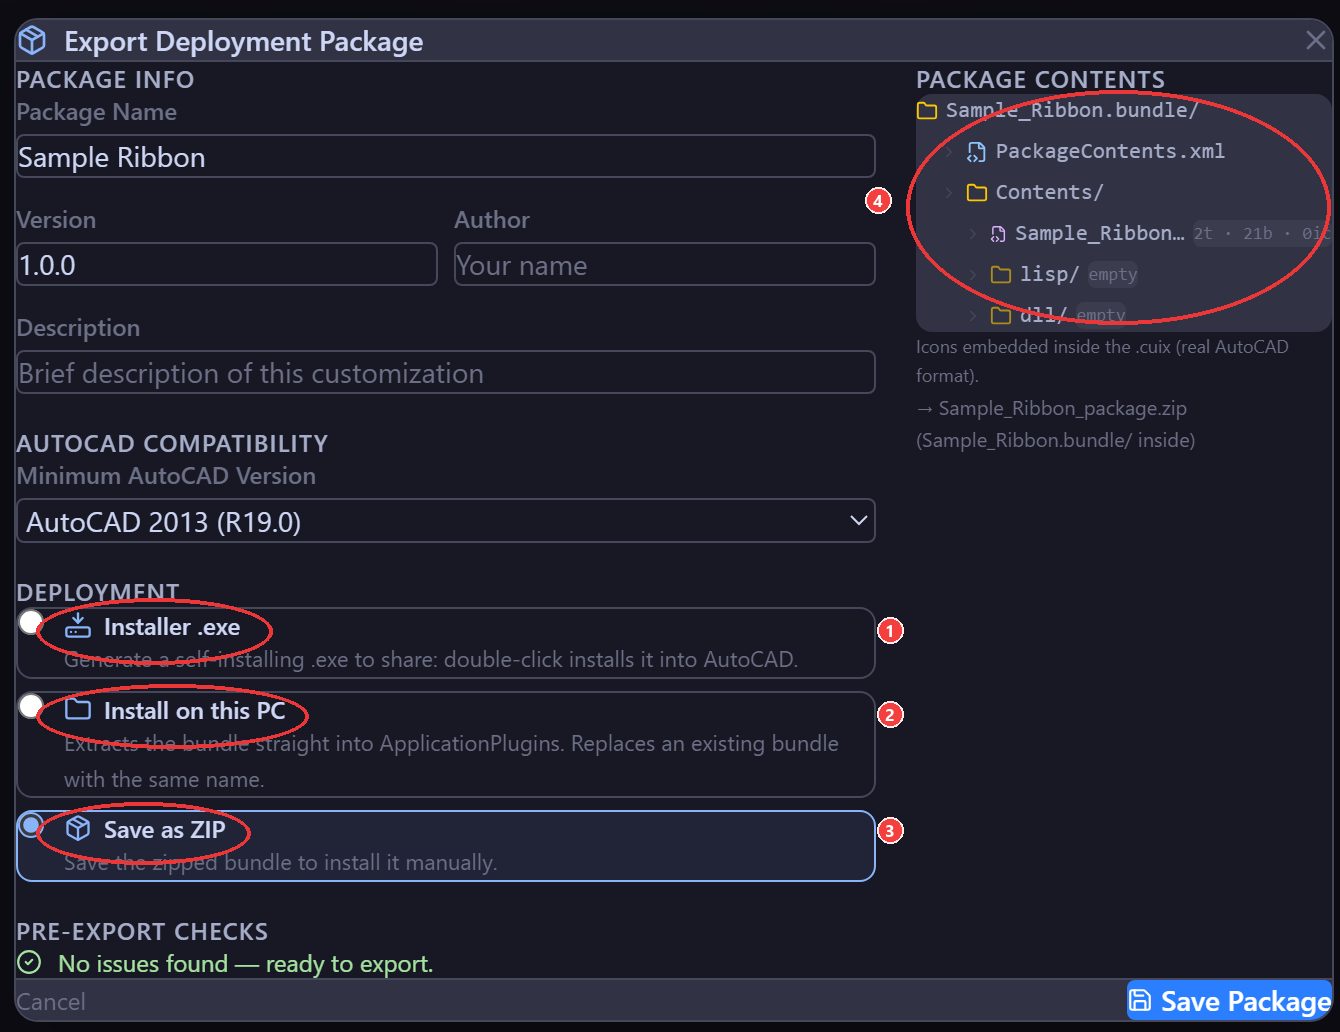
Diálogo de exportación: los tres modos de despliegue (①②③) y la vista previa del contenido del paquete (④).The export dialog: the three deployment modes (①②③) and the package-contents preview (④).
| # | Qué haceWhat it does |
|---|---|
| ① Instalador .exeInstaller .exe | Genera un ejecutable autoinstalable: el usuario final hace doble clic y se instala en AutoCAD solo, sin pasos manuales. Ideal para compartir.Generates a self-installing executable: the end user double-clicks and it installs into AutoCAD on its own, no manual steps. Best for sharing. |
| ② Instalar en esta PCInstall on this PC | Copia el bundle directamente a %APPDATA%\Autodesk\ApplicationPlugins\ de tu equipo; queda listo al reiniciar AutoCAD.Copies the bundle straight to your machine's %APPDATA%\Autodesk\ApplicationPlugins\; ready when you restart AutoCAD. |
| ③ Guardar como ZIPSave as ZIP | Genera el paquete .bundle comprimido para distribuirlo o instalarlo manualmente.Generates the zipped .bundle package to distribute or install manually. |
| ④ Contenido del paquetePackage contents | Vista previa de los archivos que se generarán: PackageContents.xml, el .cuix y las carpetas lisp/ y dll/. Así confirmas qué se incluye antes de exportar.A preview of the files that will be generated: PackageContents.xml, the .cuix, and the lisp/ and dll/ folders. Confirm what's included before exporting. |
Para proyectos nuevos (desde cero), CUIX Maker organiza el contenido así:For new projects (from scratch), CUIX Maker organizes the contents like this:
PackageContents.xml declara SupportPath="./Contents;./Contents/lisp;./Contents/dll" para que AutoCAD encuentre los LISP y DLL por su nombre base. Los proyectos antiguos que cargues conservan su estructura original.The PackageContents.xml declares SupportPath="./Contents;./Contents/lisp;./Contents/dll" so AutoCAD finds the LISP and DLL files by base name. Older projects you load keep their original structure.13. Cargar en AutoCAD13. Loading in AutoCAD
- Autoloader (recomendado): coloca el
.bundleen%APPDATA%\Autodesk\ApplicationPlugins\(lo hace el instalador o el modo «Instalar en esta PC»). AutoCAD lo carga al arrancar y aplica elSupportPath, así los LISP/DLL se resuelven solos.Autoloader (recommended): place the.bundlein%APPDATA%\Autodesk\ApplicationPlugins\(the installer or "Install on this PC" mode does this). AutoCAD loads it at startup and applies theSupportPath, so LISP/DLL resolve automatically. - CUILOAD manual: también puedes cargar el
.cuixcon el comandoCUILOAD, pero entonces elSupportPathdel bundle no se aplica; tendrías que añadir las rutas de los LISP/DLL manualmente en Opciones → Archivos.Manual CUILOAD: you can also load the.cuixwith theCUILOADcommand, but then the bundle'sSupportPathis not applied; you'd add the LISP/DLL paths manually in Options → Files.
14. Solución de problemas14. Troubleshooting
| SíntomaSymptom | Causa / soluciónCause / fix |
|---|---|
| «no function definition: FBOUNDP»"no function definition: FBOUNDP" | Una macro usa fboundp, que no existe en AutoLISP. Regenera la macro desde CUIX Maker (usa (if (not c:CMD)…)).A macro uses fboundp, which doesn't exist in AutoLISP. Regenerate the macro from CUIX Maker (it uses (if (not c:CMD)…)). |
| «LOAD failed» al cargar un LISP"LOAD failed" loading a LISP | La macro apuntaba a una subruta (lisp/x.lsp). Debe usar solo el nombre base y el SupportPath debe incluir ./Contents/lisp. Despliega con el Autoloader.The macro pointed at a subpath (lisp/x.lsp). It must use just the base name, and the SupportPath must include ./Contents/lisp. Deploy with the Autoloader. |
| DLL: «BadImageFormatException»DLL: "BadImageFormatException" | El archivo no es un ensamblado .NET válido (o mezcla 32/64 bits). Usa la DLL real compilada para tu AutoCAD.The file isn't a valid .NET assembly (or mixes 32/64-bit). Use the real DLL compiled for your AutoCAD. |
| Los iconos no aparecenIcons don't show | Asegúrate de asignar el icono en el inspector; al exportar se empaqueta y referencia automáticamente.Make sure you assign the icon in the inspector; on export it is packaged and referenced automatically. |
15. Atajos de teclado15. Keyboard shortcuts
| Ctrl+S | Guardar (sobrescribe el original o guarda .cuixproj).Save (overwrite original or save .cuixproj). |
| Ctrl+Z | Deshacer.Undo. |
| Ctrl+Y | Rehacer.Redo. |
| Ctrl+ruedawheel | Zoom independiente de la zona bajo el cursor.Independent zoom of the zone under the cursor. |
| Esc | Quitar la selección actual.Clear the current selection. |